Doctor Who Week – Madame Vastra

Day Three – Madame Vastra

Obviously I don’t have the skill to create the full faced look she has. I thought about doing scales, but I had already done that with my Dragons Lair halloween look a few weeks ago. So I decided to keep this simple, with lots of layering and blending to achieve an awesome green look. And because I took these at 8pm at night with crappy lighting the photos aren’t the greatest, but hopefully you can see what I was going for. Also, please excuse my awful chapped lips 😦 Not drinking enough water and my body is really suffering.

Anyway, on to the look!

IMG_0885

IMG_0886

Products used:

– NYX eyeshadow base in White

– SugarPill pressed eyeshadow in Subterranean

– SugarPill loose eyeshadow in Darling

– SugarPill loose eyeshadow in Tipsy

– Sugarpill loose eyeshadow in Absinthe

– Physicians Formalua Eyebooster in Ultra Black (yay! my baby has returned)

– Sugarpill pressed eyeshadow in Midori

I didn’t actually mean to make this a mostly SugarPill look, I just happened to have them handy.

I hope you guys are still enjoying the series. I know the last two looks haven’t been as exciting as the original Dalek look, but I can’t wear sequins everyday.

Halloween Series – Dragons Lair

Hey Beauty Babes! It’s that time of the week again! Time for our Halloween Series.

When I sat down to do this look today, I had absolutely no idea what to do. Luckily, my friend Jazz is around and gave me the inspiration of “dragons”. I could have gone off on a very “magical” tangent, but i decided to keep this a little more grounded (well, as much as you can when the inspiration is dragons!).

Just like last week, I’m going to list the products I used and where, as opposed to doing a full on tutorial. The key to this look is blending, and using the gold-ish shade to highlight in the right areas. I just applied and blended the best I could, so it’s far from perfect.

009

Eyes

  • NYX eyeshadow base in white
  • Sugarpill Midori all over lid and into crease
  • Sugarpill bulletproof in crease.
  • Sugarpill Junebug into crease and blended out below the eye
  • The gold/light bronze colour from the Covergirl exact eyelights eyebrightening shadow palette, for highlight (mostly in the crease).
  • NYX Curve eyeliner for the upper eyeline, and the scales around the outside of the eye (and take it down just under the eye).
  • NYX Slide On eye pencil in Jet Black for the waterline.
  • L’Oreal High Intense Pigments in Unashamed in the inner corner.
  • Designer Brands Beyond amplifying mascara in blackest black

008

Face

  • NYX Stay Matte but Not Flat liquid foundation in Nude.
  • NYX Stay Matte but Not Flate powder foundation in Nude.
  • Thin Lizzy 6 in one professional powder in EM32 (i think that’s light?) for contour
  • Physicians Formula Happy Booster Glow and Mood Boosting Blush in Rose just on the highest part of the cheekbone.


Lips

  • NYX Thin lip pencil in Cabaret to line and fill in the lips.
  • OCC Metallic Lip Tar in Role Play.

018

Hope you like this weeks look.  We have just one more to go, and I’m hoping to make it special for you.

012

Also, I will be running a couple of special posts during the last week of October, as Halloween is my wedding anniversary so I want to do something nice to celebrate.

As always, comments are always appreciated, let me know what you liked or didn’t like about this look!


Halloween series – Leopard Print

(yes it’s a very unimaginative title, if you have a better one please let me know).

Hey Beauty Babes! It’s October so you know what that means…Halloween! My favourite time of year (even though it’s not really celebrated here in Australia). Also, it’s my wedding anniversary on Halloween so yay! Here is the first instalment in this new series.

Base:

1. Apply L’oreal Base Magique primer all over.

2. Apply Rimmel Stay Matte foundation in Ivory.

Eyes:

017

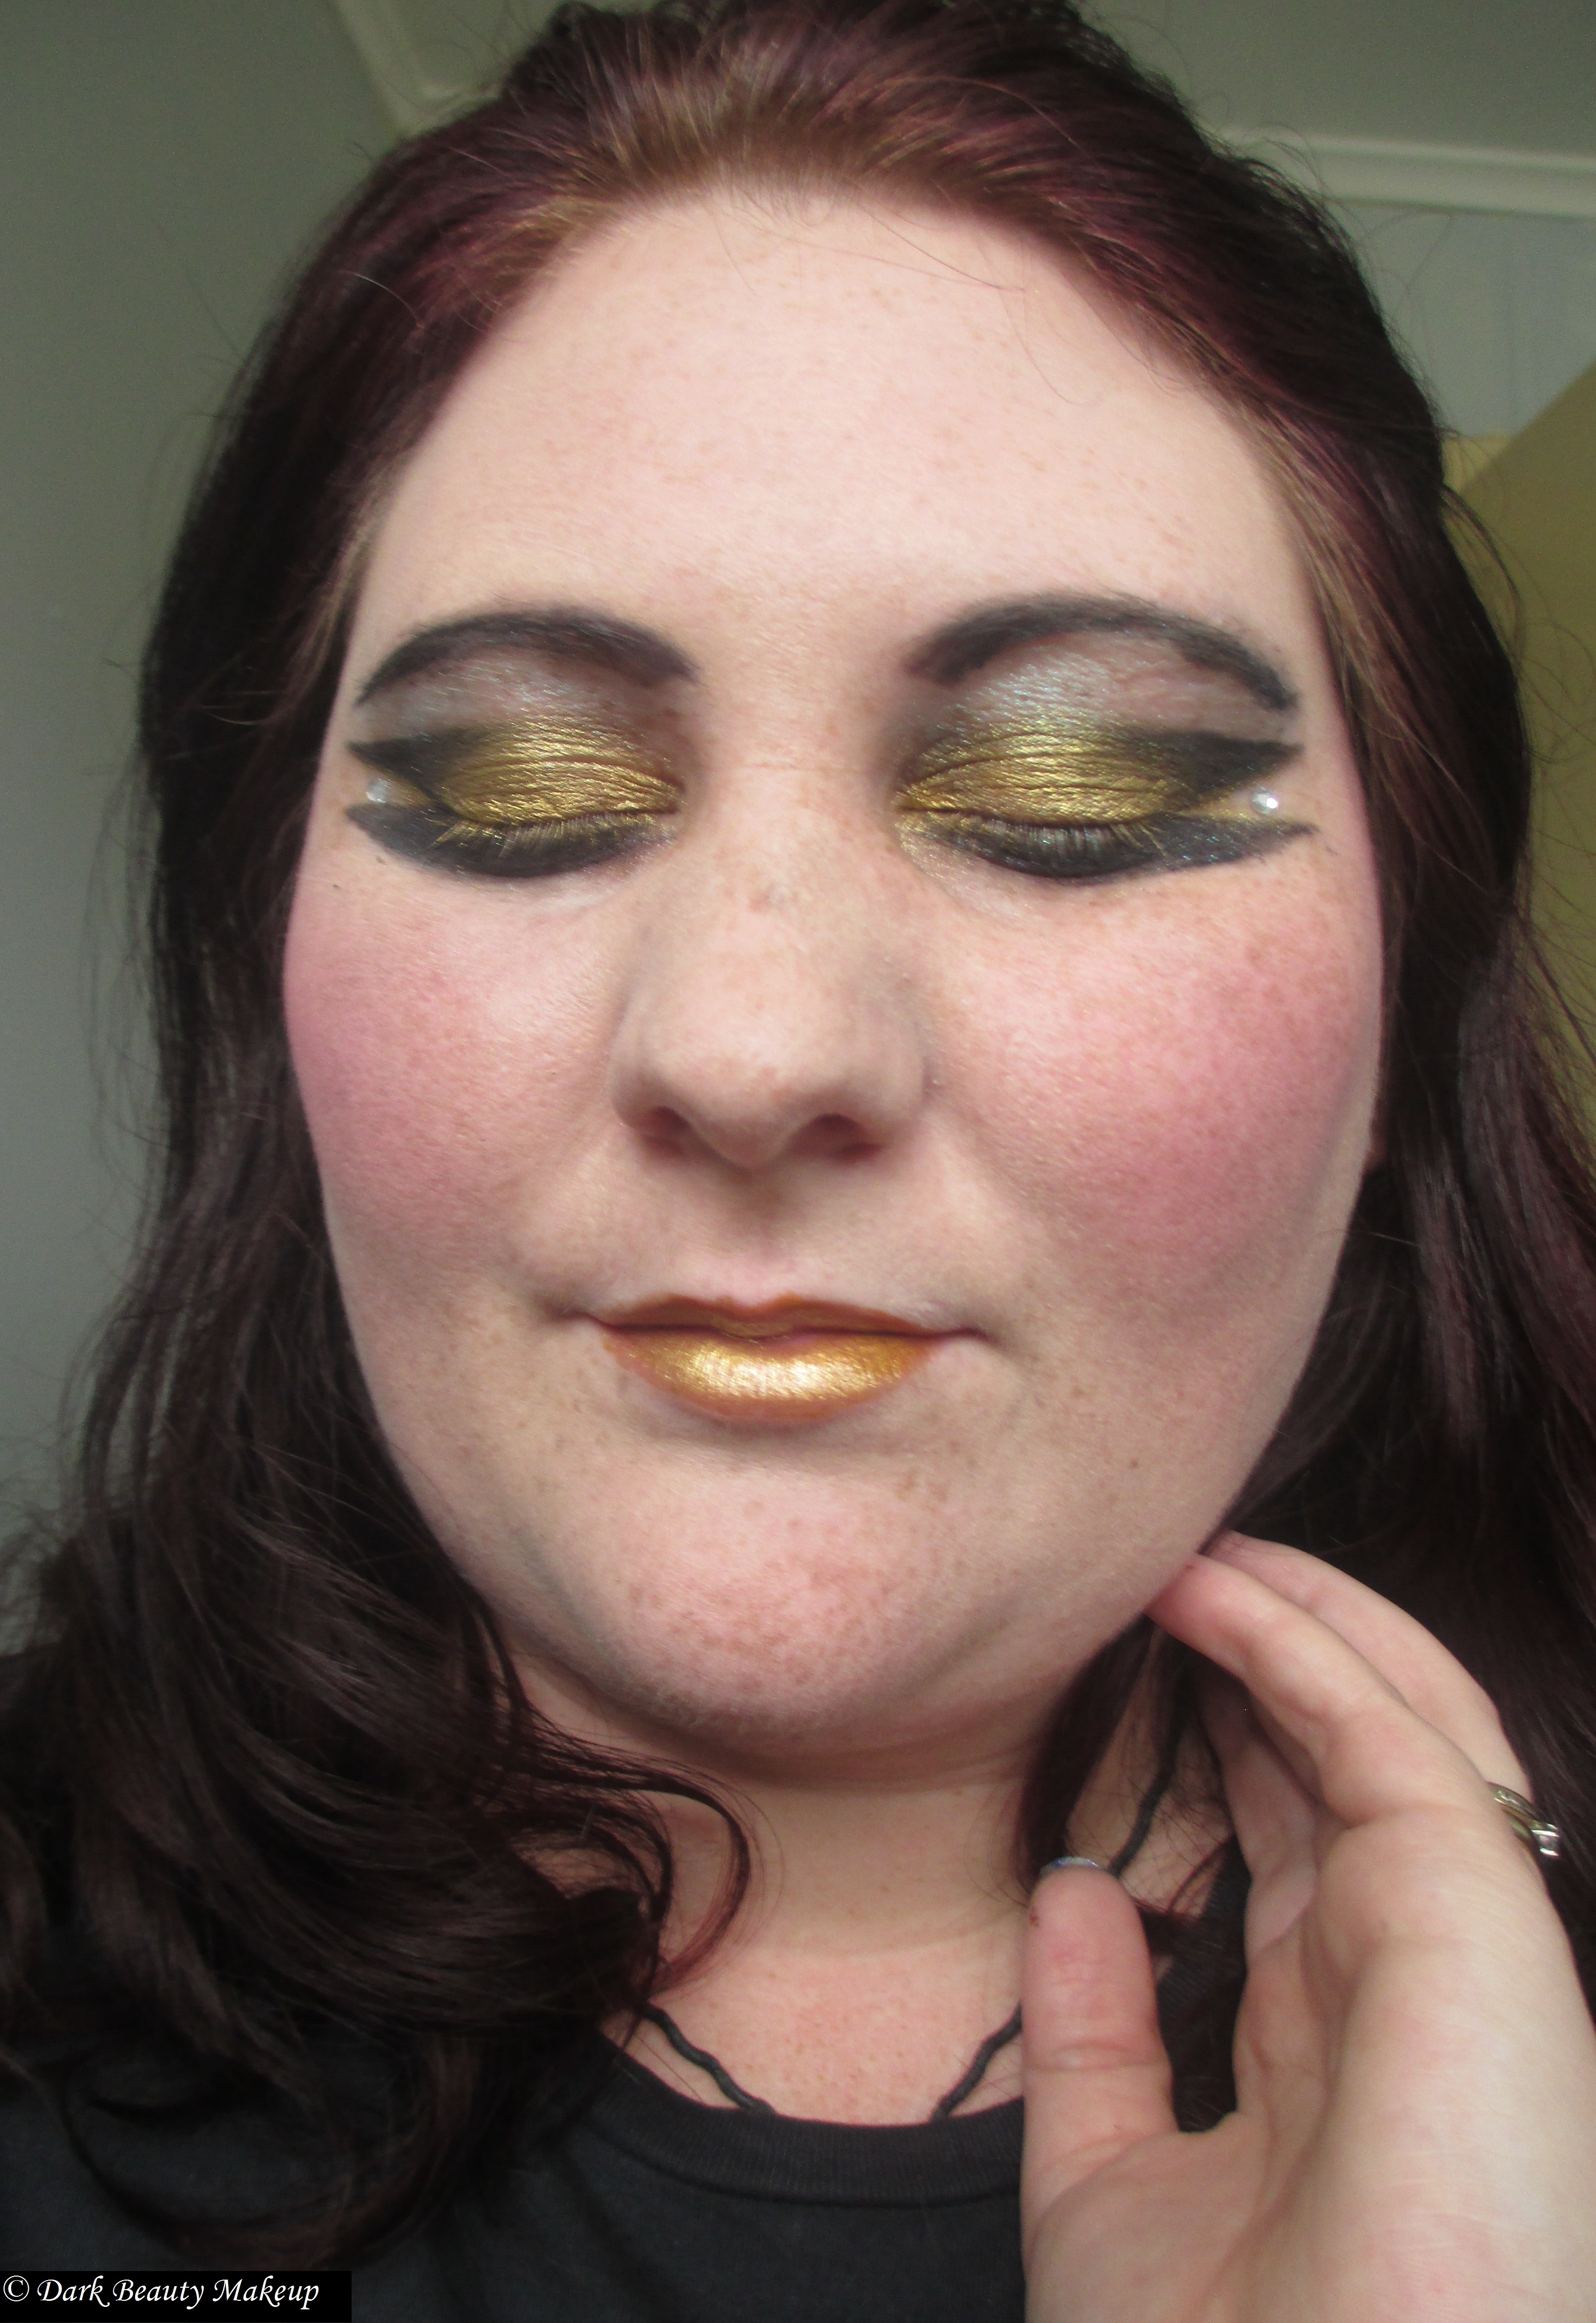
I decided to use a palette I hadn’t used in a while – my NYX Dark Shadows palette.

1. Apply NYX eyeshadow base in white all over the entire area.

2. Pat the medium-brown shimmery bronze over the eye area, and take it out at an angle . Make sure it goes all the way over the brow bone.

3. Drag the same colour under the eye, and into the tear duct.

4. Next, use the burnt gold to create an outline/contour around the edge of the shadow.

5. Take a felt tip eyeliner – I’m using my new NYX curve in jet black – and draw little “C” shapes over the area. They don’t have to be perfect, so don’t worry if they aren’t all perfect – nature isn’t perfect.

6. After you have created the “C”s, take a detailing brush, pick up some of the burnt cranberry colour and fill in the Cs.

7. Using the same detailing brush, pick up a small amount of Sugarpill Goldilux and dab it on top of the cranberry.

8. Take a pencil brush and apply goldilux to the inner corner.

9. Apply a line of  NYX eyeliner to the upper lash line.

10. Using a Kohl eyeliner – I used Designer Brands Kohl Pencil in black – line the waterline. Set with Sugarpill bulletproof.

11. Apply 2 coats of mascara – I used Designer Brands Beyond Amplifying mascara.

12. Finally, apply your lashes – mine are Eyelure Naturlites (really easy to work with btw).

016

Cheeks.

1. For my contour AND bit of a blush, I used Thin Lizzy 6-in-1 powder in light. You could probably just use a nice bronzer.

2. Go back to the NYX palette, pick up some of the highlighter on the same brush you used for your contour, and apply on the apple of your cheeks and around the eyes.

014

Lips:

1. As i’m using black lipstick, it usually helps to use a spare eyeliner or just a gel liner to line your lips.

2. Apply Makeup Forever Professional Artist Rogue Artist Intense Lipstick in shade 50.

013

And you are done!

Hope you guys liked this look. Please show your love with comments and likes, and I will see you guys later 🙂

Masquerade Look Series Part Three

Hey Beauty Babes! Finally getting something done on time this week.

I was inspired by this photo that I found on Pinterest for this weeks look. I decided to change up the colours, and also I don’t have the skill that this makeup artist does!

Eyes

009


1. Start by applying NYX eyeshadow base in white over the lids.

2. Apply Sugarpill Tako into the brow bow and blend down and over.

3. Pat Sugarpill Velocity into the eyeshadow base, make sure the coverage is even.

4. Blend Sugarpill Afterparty into the outer edge of Velocity.

5. Pat Sugarpill Royal sugar over the entire lid.

6. Using the black gel liner in the Physicians Formula Custom Eye Enhancing Gel Cream liner shimmer strips set for blue eyes (phew that was a mouthfull), create a fairly thick line over the upper lash line and into the lid.

7. Use NYX Jumbo Pencil in Black Bean to apply to the waterline, and create a thick line underneath the eye.

8. Grab a pencil brush and drag Afterparty into the corner of the eye and blend it underneath the eye.

9. Using a angled brush or thin eye pencil), draw “vine” like designs out from the corner of the eye.  Make sure they have some swirls!

10. Apply black gel liner to your eyebrows, and then drag some in between your eyes.

11. Use some of the blue gel liner from the same set to accent some areas on the “vines”. I also created a diamond in between my eyes.

12. Carefully pat Royal Sugar into the same accent areas, blending it a little bit. Use Royal Sugar to fill in the diamond.

13. Apply rhinestones wherever you want them. Clean up any fallout and you’re done.


Lips

008

1. Apply Lime Crime Loop-de-loop all over the lips.

2. Pat Royal Sugar over for a bit more “pop”.

And done!


Once again, I was really lazy and didn’t apply any foundation. I did however use a tiny bit of afterparty as a small pop of colour on my cheeks.

006

016


Oh and yes, I got my hair done! I feel a little guilty, cheating on my beloved Olia, but I really needed a hair cut and treatment, so I got my purple enhanced. Sexy no?


Hope you guys like it! Any suggestions for a name for this look? Suggestions in the comment section below!

Review – Sugarpill Cold Chemistry Palette

Review – Sugarpill Cold Chemistry Palette

$39, Beserk Clothing

4 x 3.5gms pans.

Hey Beauty Babes! This has been around for like 3 weeks now and mine has FINALLY arrived! I had to order mine direct from Sugarpill, but Beserk is now selling it in their store.

You can get this as the full palette, or as always, you can buy the colours individually.

A luxury eyeshadow collection created in collaboration with Amelia Arsenic, designer of cult fashion and art brand A is for Arsenic London.

This dark collision of glamour and nocturnal worlds features four richly pigmented, shimmering meteoric shades which blend seamlessly together. The collection combines Amelia’s dark aesthetic with Sugarpill’s trademark velvety smooth eyeshadow formula.

001

The case is so awesome, with each colour represented in some way. The “shattered” design is pretty cool. It has a magnetic lid so it wont accidentally open in your purse or something.

On the back you will find each of the colours listed in their own little diamond.

003

Inside, you have a “shard” of mirror plus each of the colours in their pan. Overall its a nice slimline shape that will fit easily into your handbag, or not take up too much space with the rest of your makeup.

004

Now on to the colours!

Soot and Stars

007

Metallic gunmetal with prismatic sparkle.

This swatches almost matte, with a nice bit of sparkle. Nothing over the top. You can definitely build the sparkle by building up the colour.

011

Diamond Eyes

008

Satin white with a crystalline sheen

I think i like this better as a brow highlight than lumi! The shimmer in this is consistent, and you don’t need to worry about any “glitter” fallout. I love that they included this so that you can create a whole look from this one palette.

012

Elemental Chaos.

009

Deep grape shimmer with blue undertones

Love. Love Love! I think this is one of my favourites. I used this on my recent masquerade look and it worked a treat. It is almost metallic with a small amount of shimmery glittery goodness.

013

Subterranean

Lustrous peacock green with navy blue undertones

010

This deep metallic green is to die for. Even though we are going into spring and all the lighter colours are coming out, I can still see this as the perfect spring evening look.

015

Overall, I adore this palette. Up until this was launched I owned every Sugarpill pigment and presses colour they had! If i didn’t get this I’m pretty sure some sort of OCD would have kicked in.

Masquerade Look Series – Part Two

Better late than never Beauty Babes! Although, I did seriously consider not posting this as I’m not 100% happy with the photos or the look overall. Just goes to show you some things never go as planned. I tried doing this a different way first but it refused to work at all, so I scrapped that and went with this.

028


1. First, use a small amount of Maybelline Colour Tattoo Metal in Silver Strike to trace out the shape that you want.

2. Fill in the area with Silver Strike BUT leave the eye area  clear.

3. Apply NYX eyeshadow base in white over the eye area.

4. Cover the mask with Sugarpill Tiara.

5. Pat Sugarpill Elemental Chaos over the eyeshadow base.

6. Apply a small amount of Sugarpill Weekender over Elemental Chaos.

7. Apply a small amount of black eyeliner to the waterline.

8. Using a black gel eyeliner and an angled brush, trace the outline of the mask to make it more prominent (and hopefully do a better job than me).

9. Apply maskara and the mask is done.

At this point you can apply your base and lipstick. I forgot to use any foundation, and I just used a pretty generic purple lipgloss.

027


024

Close up of my sexy flower


017

Hopefully this weeks look will be on time, and will come out looking a lot better! As always, comments and suggestions are always welcome.


Masquerade Look Series – Part One

Hey Beauty Babes.

A while ago for ideas on the Facebook series for a possible series of looks to do, and this was one of the suggestions. Every week in September I will be posting a different look, starting with todays “simpler” look, all the way up to an awesome full faced look.

The colours for todays look are inspired by my sweet new Batman top (don’t judge me).

031

Tutorial:

1. Apply face primer.

2. Using your finger, apply Maybelline Colour Tattoo in Bold Gold to the lid.

3. Using a stiff shader brush, pat Sugarpill Goldilux over the lid and into the crease.

4. Create a wing out past the eye using an angled brush and black gel eyeliner.

5. Blend the eyeliner into Goldilux and back again.

6. Draw an angled line out from the corner of your eye and then drag it into the inner eye, creating a curve. Fill this in.

7. Place Goldilux over the waterline and under the eye.

8. Cover the gel eyeliner with Sugarpill Stella.

9. Use Lumi on the brow bone.

10. Apply mascara.

11. Clean up any fallout, and use your favourite foundation.

12. Apply blush.

13. Draw on distinct eyebrows with gel eyeliner and an angled brush.

14. Use Lime Crime Carousel Gloss in Golden ticket on the lips.

15. Place Goldilux over Golden ticket.

036

And you’re done!

Here are some more pics of the look (because I was feeling rather sexy today).

030

035


041

043

044

046

So what do you think of this look? Any suggestions for next weeks look? Comment below

Look of the day – Adventures in Layering

Hey Beauty Babes!

Todays look is partially inspired by a new t-shirt that I got from K-mart, and partially about me trying out my skills in layering and blending makeup. I hope you enjoy this look!


011


011


As i always do with heavier looks like this, I did my base second, so I will list the eye products I used first.

Eyes:

– NYX eyeshadow base in white all over the lid.

– Sugarpill Chromalust Loose Pigment in Magpie over the lid and just under the eye

– Sugarpill Chromalust Loose Pigment in Junebug (finally found a use for it) it the centre of the lid and layered over Magpie underneath.

– Sugarpill Chromalist Loose Pigment in Weekender, blended at the outer corner and a small amount placed at the inner corner.

– MAC eyeshadow in Brule blended at the brow bone.

– Physicians Formula 2-in-1 eyebooster liner for upper lash line.

– NYX Jumbo pencil in Black Bean for lower lash line.

– Rimmel Volume Flash masacara in Extreme black.


Face.

– Covergirl Trublend concealer in shade 1.

– Covergirl Trublend Foundation in Shade 1.

– Covergirl Clean pressed powder in 105 Ivory.

– Rimmel Lasting finish minerals loose powder in 200 soft beige for contour.

– Physicians Formula happy booster blush in Rose.


Lips – I even layered the lips!

012


– OCC lip tar in Stalker

– Lime Crime Carousel Gloss in Present over the top.


And here is the finished look.

003


Hope you guys enjoyed! Till next time my Beauty Babes.

Look of the day/Tutorial – “Midori and Lemonade”

Hey Beauty Babes!

So this post today is pretty similar to my normal “look of the day”, except i’m going to give you a bit more of a breakdown, step by step, of what I did. Maybe one day I will be brave enough to do this in front of a camera, but for now, this will work!

Just a heads up: any time you are working with loose pigments, its best to apply your foundation SECOND. This makes it easier to clean up any fallout!.

Step one: Apply NYX eyeshadow base in White all over you lids (you could probably use NYX jumbo pencil in Milk).

Step two: Pat Sugarpill pressed eyeshadow in Midori over the lid (patting makes it more intense than just sweeping over the lid) until all the white is covered.

Step three: Sweep Sugapill Chromalust loose eyeshadow in Tipsy over Midori, and blend out into the crease.

Step Four: Blend Sugapill Chromalust loose eyeshadow in Absinthe into the crease, and out a little.

Step Five: Lightly sweep Sugapill Chromalust loose eyeshadow in Lumi on the brow bone.

Step six: Apply a little bit of NYX Jumbo pencil in black bean to the outer section of the water line.

Step Seven: using a eyeliner brush, apply Maybelline 24hr Colour tattoo Metal in Silver Strike under the eye.

Step Seven: Place Sugapill Chromalust loose eyeshadow in Tiara on top of Silver Strike, and take it out past the eye (like eyeliner).

Clean up time!

Step Eight: Whatever foundation routine you like to use can be used here – I was being lazy again and used Manic Panic Vampyre Veil in Midnight.

Step Nine: Apply false eyelashes (mine are just a generic cheapy brand that I can remember the name of).

Step 10: Apply mascara to blend the lashes together.

Step 11: Place a little bit of eyeliner over the lash band to blend it in: I used my Eyebooster.

Step 12:  Apply blush – I used my trusty Physicians Formaula happy boosting blush in Rose.

Step 13: Apply lipgloss – I recommend a pinky colour (Mine is an Avon lipgloss – the name has completely worn off).

Use whatever setting spray you prefer and you are done!

With flash

With flash

No Flash

close up!

close up!

There you go guys. Hope this was informative for you. let me know what you thought in the comments section below.

LOTD – Midnight Beauty

Hey Beauty Babes!

Last night while my hubby was still recovering from his wisdom teeth removal, i decided to have a play with some of my makeup. I put this look up on the Dark Beauty Makeup facebook page and asked my followers to name it.  Brittany from ‘Mix’n’make Down Under‘ came up with my favourite suggestion!

Sorry its so blurry!

Sorry its so blurry!

005010

Here’s what I used to create this look

Eyes

  • MAC Brule (my one and only MAC eyeshadow) on brow bone
  • Maybelline 24hr Colour Tattoo Metal in Silver Strike on the lid
  • Sugarpill Chromalust Loose Pigment in Weekender in the crease and under the eye
  •  Sugarpill Chromalust Loose Pigment in Tiara over the lid and into the inner corner.
  • NYX Jumbo Pencil in Black Bean on the water line
  • Physicians Formula Eye Booster 2 in 1 lash boosting eyeliner and serum in Ultra black for the upper lash line
  • Maybelline Illegal Length Fibre Extensions mascara.

Face

  • Manic Panic Vampyres Veil pressed powder in moonlight
  • Physicians Formula Happy Booster Glow and Mood Booster in Rose

Lips

  • Revlon Super Lustrous Lipstick in Va Va Violet